
A Window to the Sky: The Beauty of Roof Lights in Home Design

Have you ever dreamed of adding a touch of magic to your living space? Well, look no further because we’re about to dive into the wonderful world of roof lights. Yes, you heard me right – those dazzling openings in your ceiling that let the sunlight flood in and transform your home into a haven of warmth and brightness.
Shedding Light on Roof Lights
Roof lights, also known as skylights, are like portals to the heavens above, bringing in natural light and adding a whole new dimension to your living space. Whether you’re lounging in your living room or whipping up a storm in the kitchen, these beauties have the power to enhance the ambience and elevate the aesthetics of any room.
Why Roof Lights?
So, why choose roof lights from Addlite over traditional windows, you ask? Well, let me break it down for you:
- Natural Light: Say goodbye to gloomy spaces and hello to sunshine! Roof lights allow copious amounts of natural light to flood into your home, creating a bright and inviting atmosphere.
- Energy Efficiency: By harnessing the power of the sun, roof lights can help reduce your reliance on artificial lighting during the day, leading to potential energy savings.
- Space Enhancement: Unlike traditional windows that are confined to walls, roof lights open up your ceiling, making rooms feel larger and more spacious.
- Privacy: Want to bathe in sunlight without prying eyes? Roof lights provide the perfect solution, offering privacy while still allowing plenty of light to filter through.
Let There Be Light: Choosing the Right Roof Light
Now that we’ve covered the benefits, let’s talk about choosing the perfect roof light for your home. With a plethora of options available, finding the right fit can seem daunting, but fear not – I’m here to guide you through the process.
Types of Roof Lights
- Fixed Skylights: These are your standard roof lights that are fixed in place and cannot be opened. Ideal for bringing in light to dark spaces without ventilation needs.
- Ventilated Skylights: If you’re looking to improve airflow in addition to light, ventilated skylights are the way to go. They can be opened manually or electronically for added convenience.
- Flat Rooflights: Perfect for modern homes with flat or low-pitched roofs, flat rooflights blend seamlessly into the roofline, creating a sleek and minimalist look.
- Pitched Rooflights: Designed for traditional pitched roofs, these roof lights add a touch of architectural elegance while maximizing light penetration.
Considerations
- Placement: Think about the orientation of your roof and the position of the sun throughout the day to determine the optimal placement for your roof lights.
- Size: Bigger isn’t always better! Consider the size of your room and the amount of natural light you want to let in when choosing the dimensions of your roof lights.
- Glazing Options: From clear to tinted, the type of glazing you choose can affect the amount of sunlight and heat that enters your home. Consider factors like energy efficiency and UV protection when making your selection.
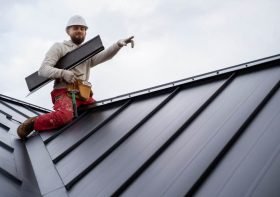
Installation 101: What You Need to Know
Now that you’ve selected the perfect roof lights for your home, it’s time to get down to business and tackle the installation process. While it may seem like a job for the pros, with the right tools and know-how, you can tackle this DIY project like a champ.
Tools You’ll Need
- Ladder: Unless you’re a master of levitation, a sturdy ladder is essential for reaching those lofty heights.
- Power Drill: For drilling holes and securing your roof lights in place.
- Sealant: To ensure a watertight seal and prevent any pesky leaks.
- Safety Gear: Don’t forget your hard hat and safety goggles – safety first, folks!
Step-by-Step Guide
- Measure Twice, Cut Once: Before you start drilling holes willy-nilly, take precise measurements to ensure your roof lights will fit snugly into place.
- Prep the Roof: Clean the area where you’ll be installing the roof lights and make any necessary repairs to ensure a smooth surface.
- Cut an Opening: Using your trusty power drill, carefully cut an opening in the roof that corresponds to the size of your roof lights.
- Install the Frame: Once you’ve created the opening, install the frame of your roof lights, making sure it’s level and secure.
- Fit the Glazing: Finally, insert the glazing into the frame and seal around the edges to prevent any water infiltration.
Of course, if you’re not experienced in projects like this, always hire pros instead!
FAQs: Answering Your Burning Questions
Still have some lingering doubts about roof lights? Don’t worry – I’ve got you covered. Here are some frequently asked questions to put your mind at ease:
- Do roof lights require maintenance? Yes, like any part of your home, roof lights require regular cleaning and inspection to ensure they’re performing at their best.
- Will roof lights make my home too hot in the summer? Not necessarily! With the right glazing options, you can control the amount of heat that enters your home, keeping things cool and comfortable year-round.
- Are roof lights suitable for all types of roofs? While roof lights can be installed on most roof types, it’s important to consult with a professional to determine the best solution for your specific needs.
In Conclusion
And there you have it – a comprehensive guide to the wonder that is roof lights! Whether you’re looking to brighten up a dark room or add a touch of architectural flair to your home, roof lights are sure to dazzle and delight. So go ahead, let there be light!


Leave a Reply